

プロジェクトの設定をエクスポートまたはインポートする
各コンポーネントごとにプロジェクトの設定をエクスポートおよび/またはインポートすることができます
目的
各コンポーネントごとにプロジェクトの設定をエクスポートおよび/またはインポートすることができます。設定は、プロジェクト内で特定のコンポーネントがどのように設定されたかをすべて含むファイルのバンドル(通常はJSONおよびコードファイル)です。これは、1つのプロジェクトから別のプロジェクトにアクションやクエリのセットを再利用しようとする場合に特に便利です。
一時アクセストークンの取得
すべてのインポートおよびエクスポートスクリプトを実行するには、一時アクセストークンが必要です。
アクセストークンを簡単に取得するには、まずインターフェースを介してプラットフォームにログインし、任意のコンポーネントを開きます。例えば、Data Processing Engineのようにします。画面上で右クリックし、Inspectを選択します。
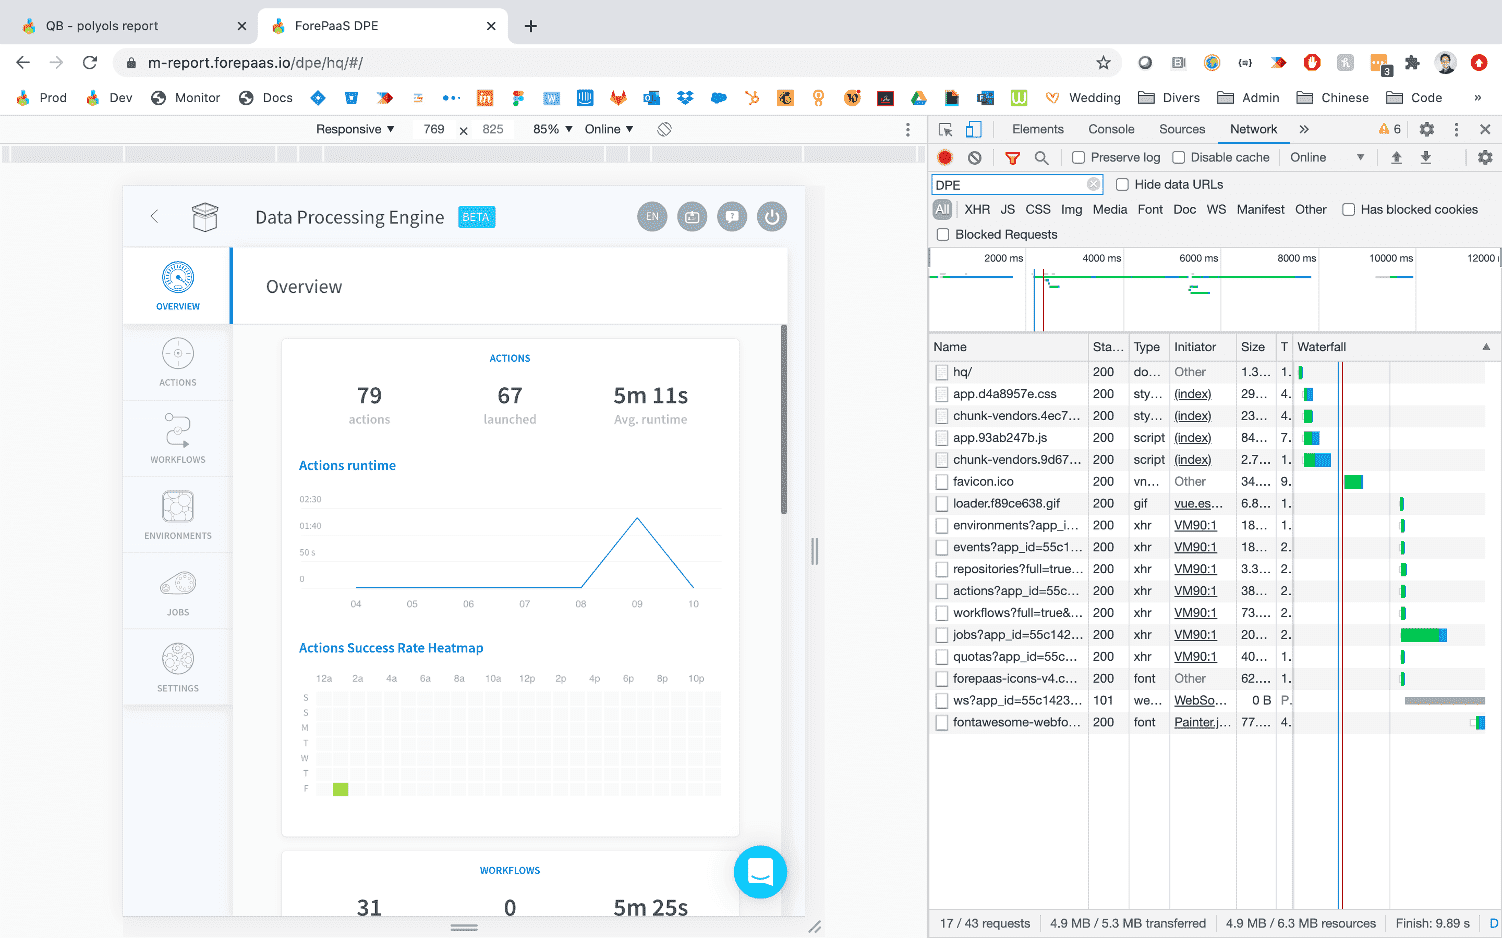
これにより、ブラウザのコンソールウィンドウが開きます。Networkタブに移動します。呼び出しが表示されていない場合は、単にF5を押すかページを更新します。上記のスクリーンショットのように、利用可能な呼び出しのリストが表示されるはずです。
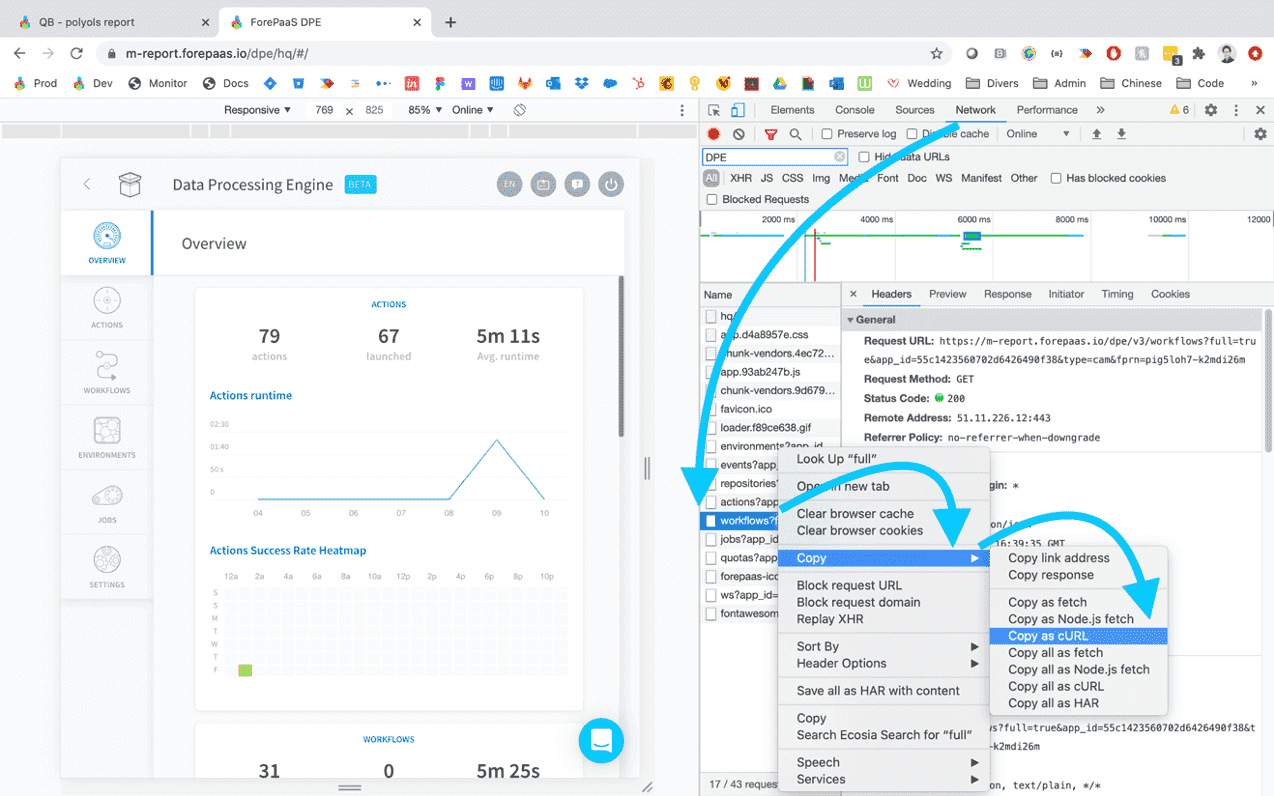
「workflows」または「actions」で始まるものを右クリックし、コピーオプションに移動し、cURLとしてコピーを選択します。これで、秘密のアクセストークンを含むcURL呼び出しをクリップボードにコピーしました。
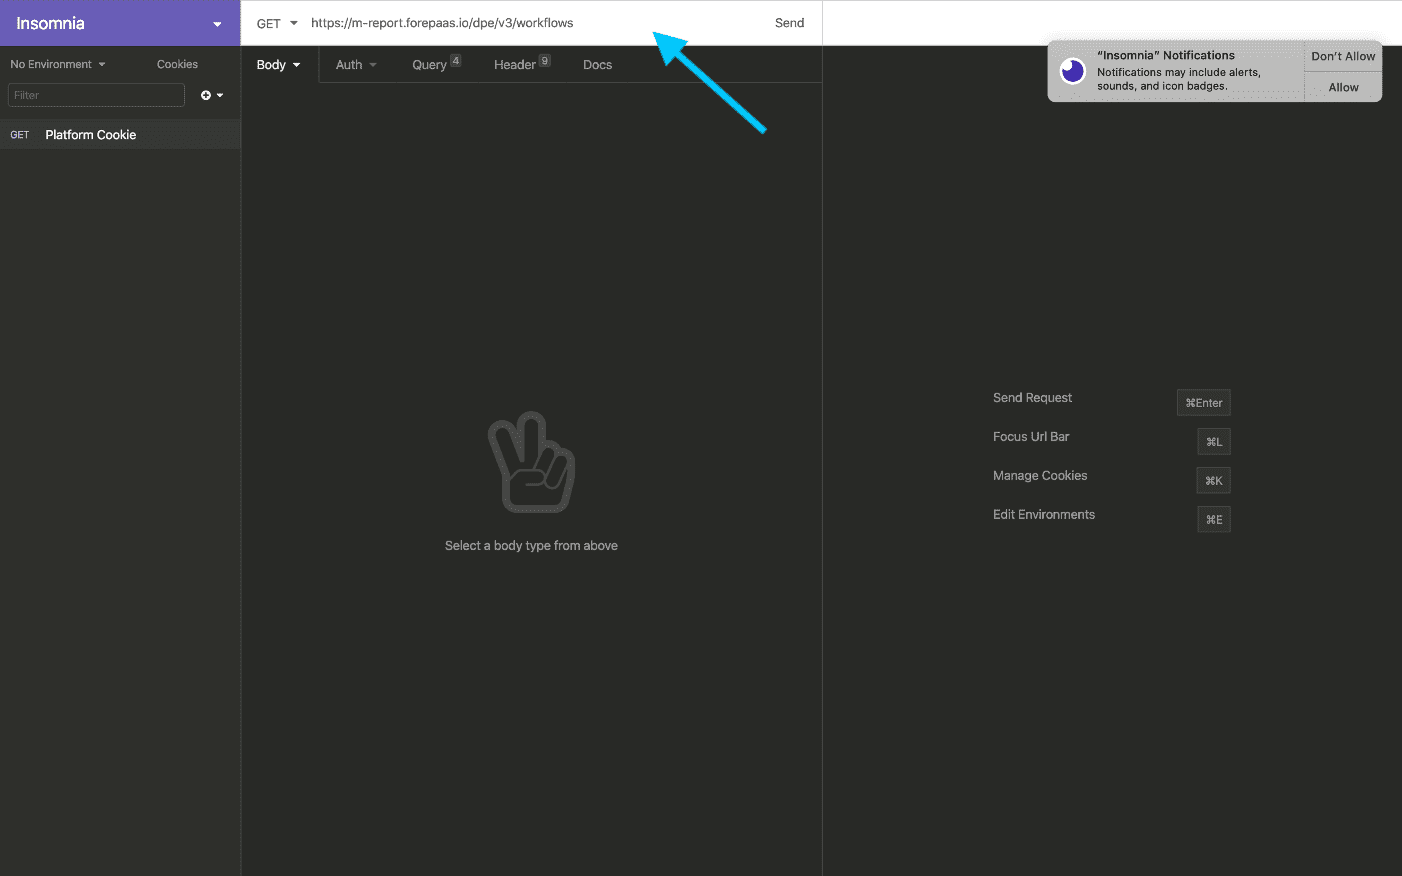
Insomniaを開き、ウィンドウの上部(Insomniaのタイトルの右側にあるGetドロップダウンボタンの隣)のメインエリアにcURLを貼り付けます。
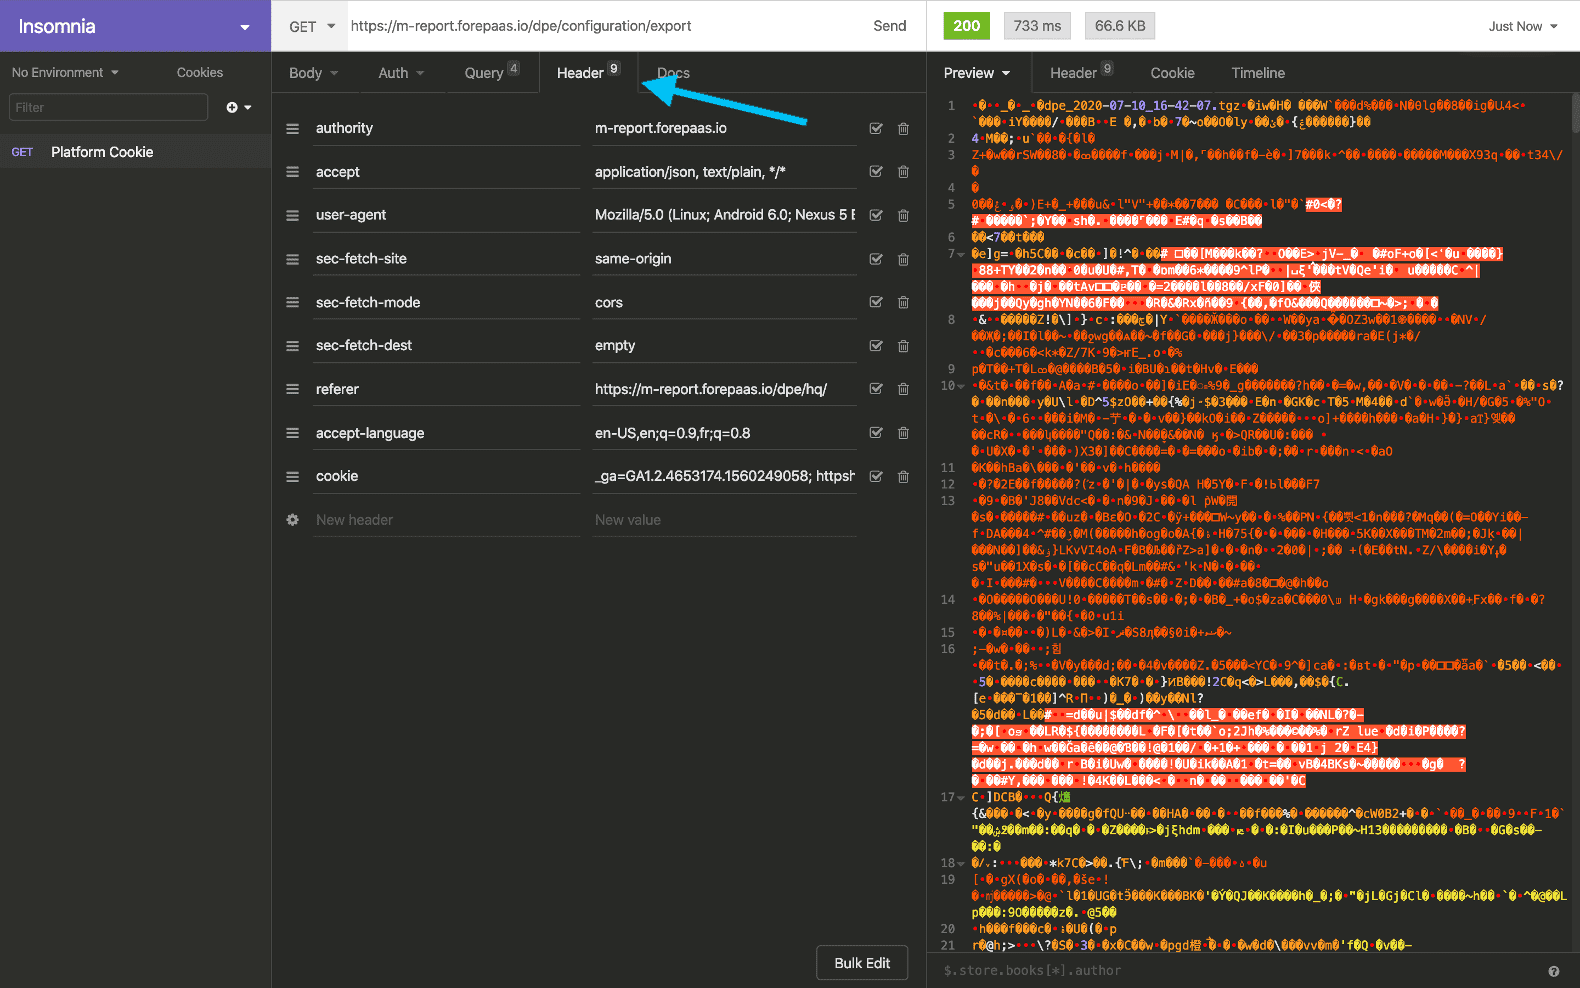
cURLをコピー&ペーストすると、Insomniaは呼び出しのすべてのパラメータを自動的に検出し、フォームを自動的に入力します。残すことは、コピー&ペーストしたものではなく、同じヘッダーパラメータのリストを保持しながら、メインエピー呼び出しのみを変更することだけです。
API呼び出しを使用して設定をエクスポート/インポートする方法
このセクションでは、プロジェクト内の特定のコンポーネントの設定をエクスポートまたはインポートするためにAPI呼び出しを使用する方法を説明します。
各コンポーネントごとの呼び出しの詳細なリストは、次のセクションで利用可能です。
一般的なルールとして、以下に注意してください。
- エクスポート 📤呼び出しを実行する場合は、GETメソッドを使用します
- インポート 📥呼び出しを実行する場合は、POSTメソッドを使用します
次の例では、Data Processing Engineの設定をエクスポートし、その後インポートするための全手順を説明します。
設定をエクスポートする方法
まず、対応するURLをコピー&ペーストし、GETに変更し、送信をクリックして設定をエクスポートします。 呼び出しが成功すると、右側にTGZファイルが返信応答に表示され、ローカルマシンにダウンロードできます。下のスクリーンショットに示すように、TGZ(tar gzipped)ファイルは圧縮されているため読み取れません。
設定をインポートする方法
次に、同じTGZファイルをインポートします。これはData Processing Engineの設定を含んでいます。下のスクリーンショットに示すように、GETメソッドをPOSTに変更し、BodyタイプをMultipart Formに変更します。
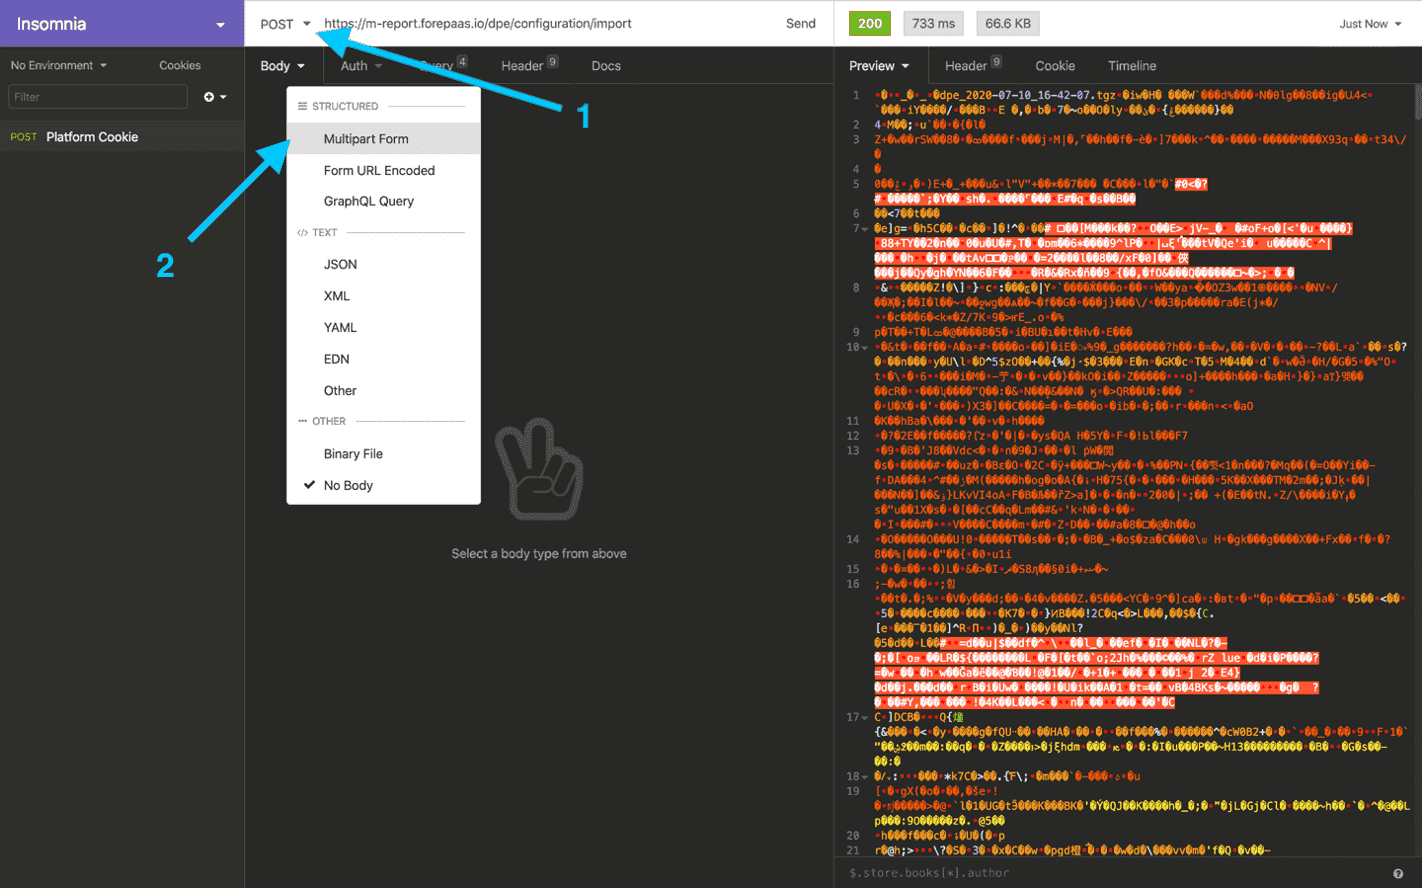
Multipart Formを選択すると、ボディにパラメータを追加し、特にリクエストの一部として以前にエクスポートしたTGZファイルを読み込むオプションが表示されます。
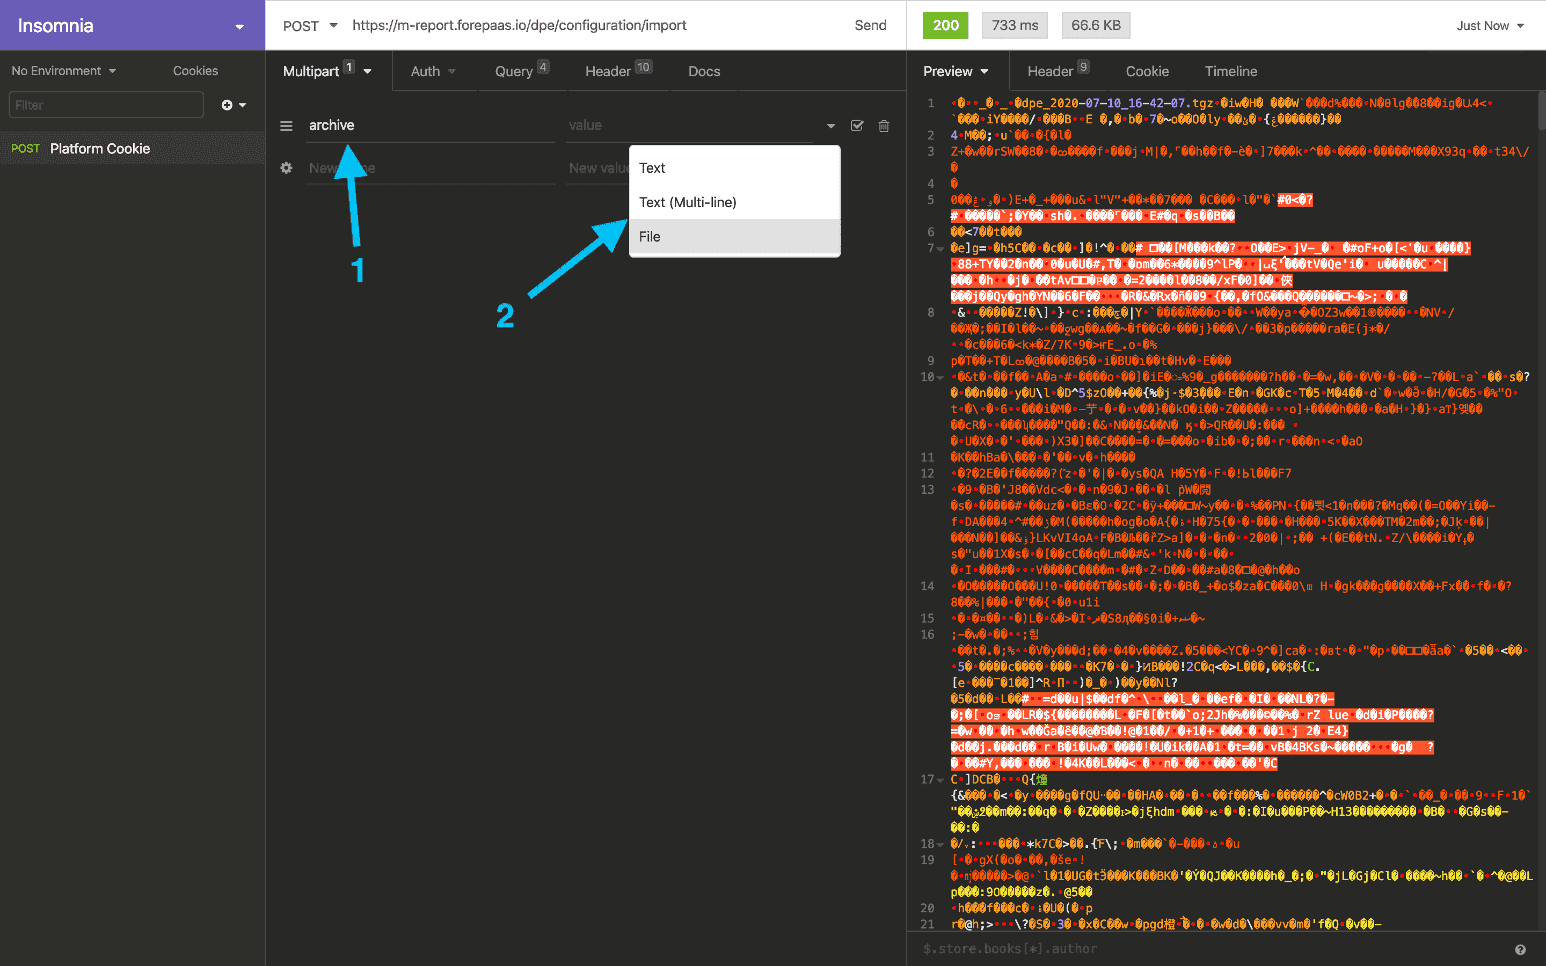
最初の入力にarchiveと入力し、値の隣のドロップダウン矢印でFileオプションを選択します。これにより、コンピュータから直接ファイルを選択して読み込むことができます。
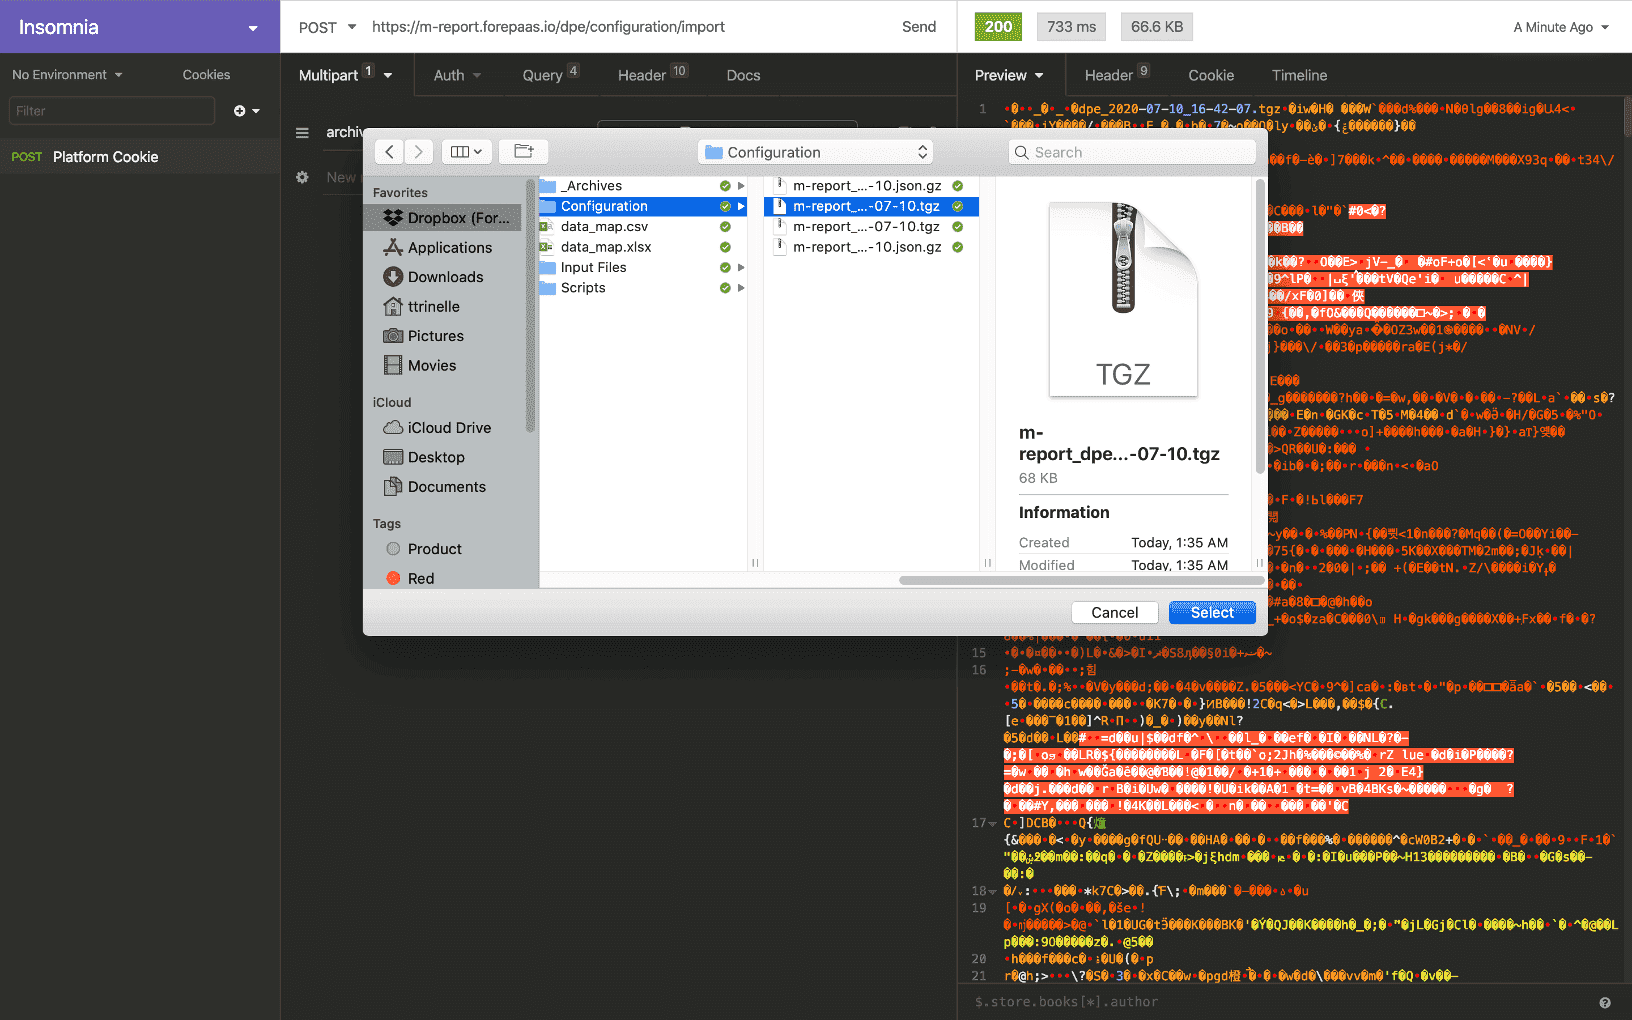
プロジェクトに読み込むTGZファイルを選択します。
送信 📨を押します。
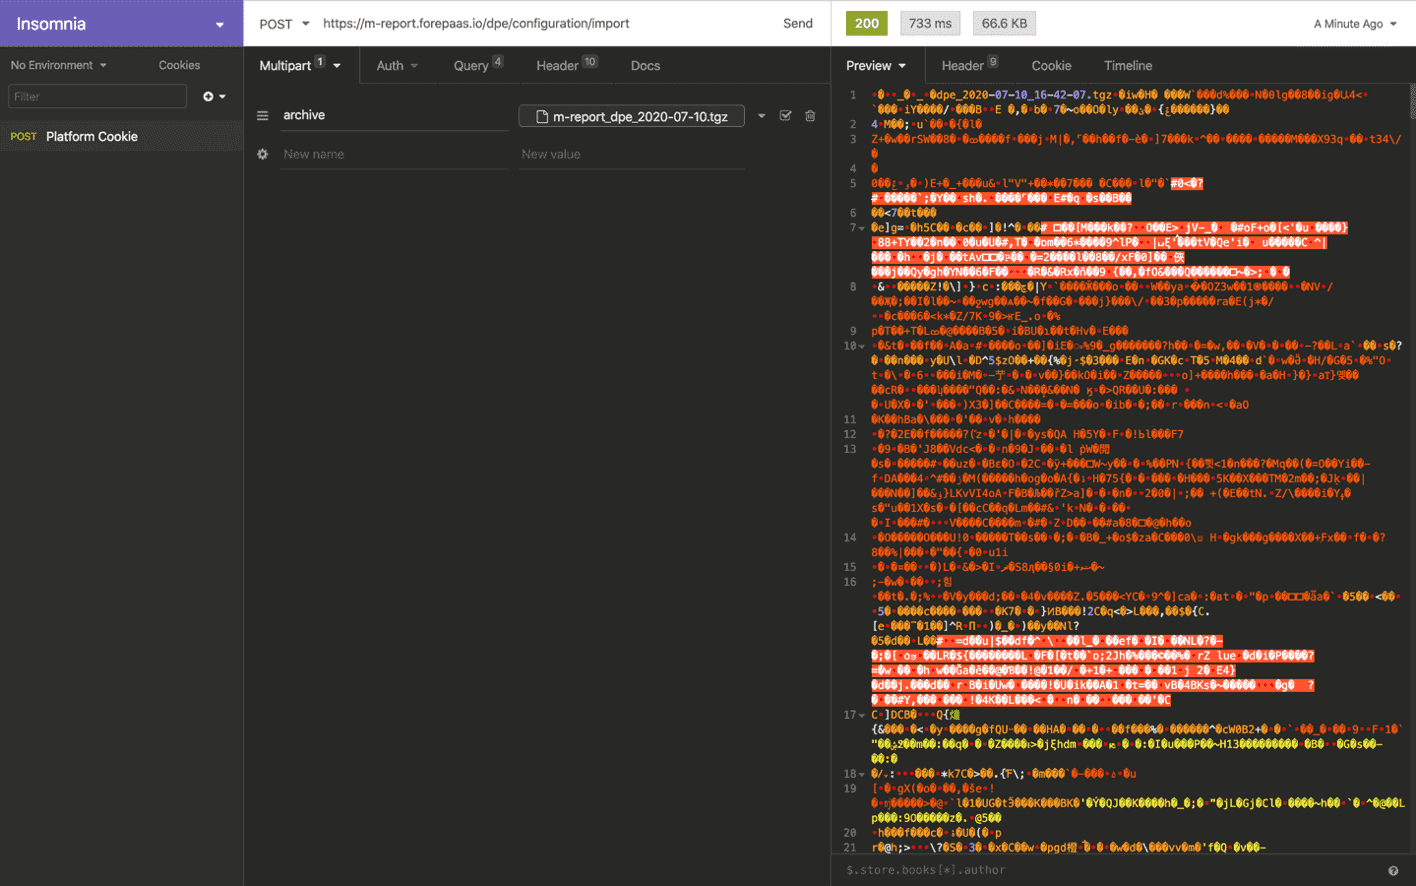
これで完了です!プロジェクトページを更新すると、すべてのコンポーネント設定が更新されたことを確認できます。
Export/Import API calls per component
Here are listed the various API calls to export/import the configuration of each component in your Project.
As a general rule, make sure to:
- use a GET method when doing an Export 📤 call
- use a POST method when doing an Import 📥 call
Don't forget to change datademo with your Project name and access token with its actual value. You can find the slugified version of your Project name in the Control Center.
Connectors and Lakehouse Manager
Export
Import
Data Processing Engine
Export
Query parameters:
It is also possible to call /dpe/v3/configuration/export as POST and pass parameters in a JSON object. This is useful for filters and notebook_data when the URL becomes too long or for security reasons.
Import
Query Parameters:
Body parameters
Notebook Manager (Standalone Export/Import)
For exporting and importing notebooks specifically, you can also use the Notebook Manager's dedicated endpoint. This endpoint currently does not support filters like the main DPE export.
Export
(This endpoint only supports the notebook_data query parameters like the main DPE export.)
Import
(Import parameters (sourceType, sourceParam, response) are the same as for the main DPE import endpoint.)
Analytics Manager
Export
Import
Identity Access Manager - IAM
Export
The response is a complete JSON of all configurations of the IAM (format .json).
It is possible to select subsets of the configuration using filters[] in the Query parameters.
Import
Please make caution when importing IAM configuration as it will: reset Project's private key, reset current sessions, all passwords (using Project Auth Provider), and all API Key / Secret Key.
This will remove existing configurations, applications, users, groups, etc. This is done on the basis of the configuration imported, so it may concern only a configuration subset selected when exporting.
The JSON to import is directly in the Body part.
Go further
If you need training or technical assistance to implement our solutions, contact your sales representative or click on this link to get a quote and ask our Professional Services experts for a custom analysis of your project.
Ask questions, give your feedback and interact directly with the team building the Data Platform on the dedicated Discord channel.
If you need support with your OVHcloud services, create a request in our Help Centre.
Join our community of users.