

Restore previous table versions with Time Travel
Time Travel is a powerful feature in Lakehouse Manager that enables you to view, explore, and restore previous versions of your tables
Objective
Time Travel is a powerful feature in Lakehouse Manager that enables you to view, explore, and restore previous versions of your tables. This capability provides complete recovery options for your data, allowing you to track changes over time and restore to any previous state when needed.
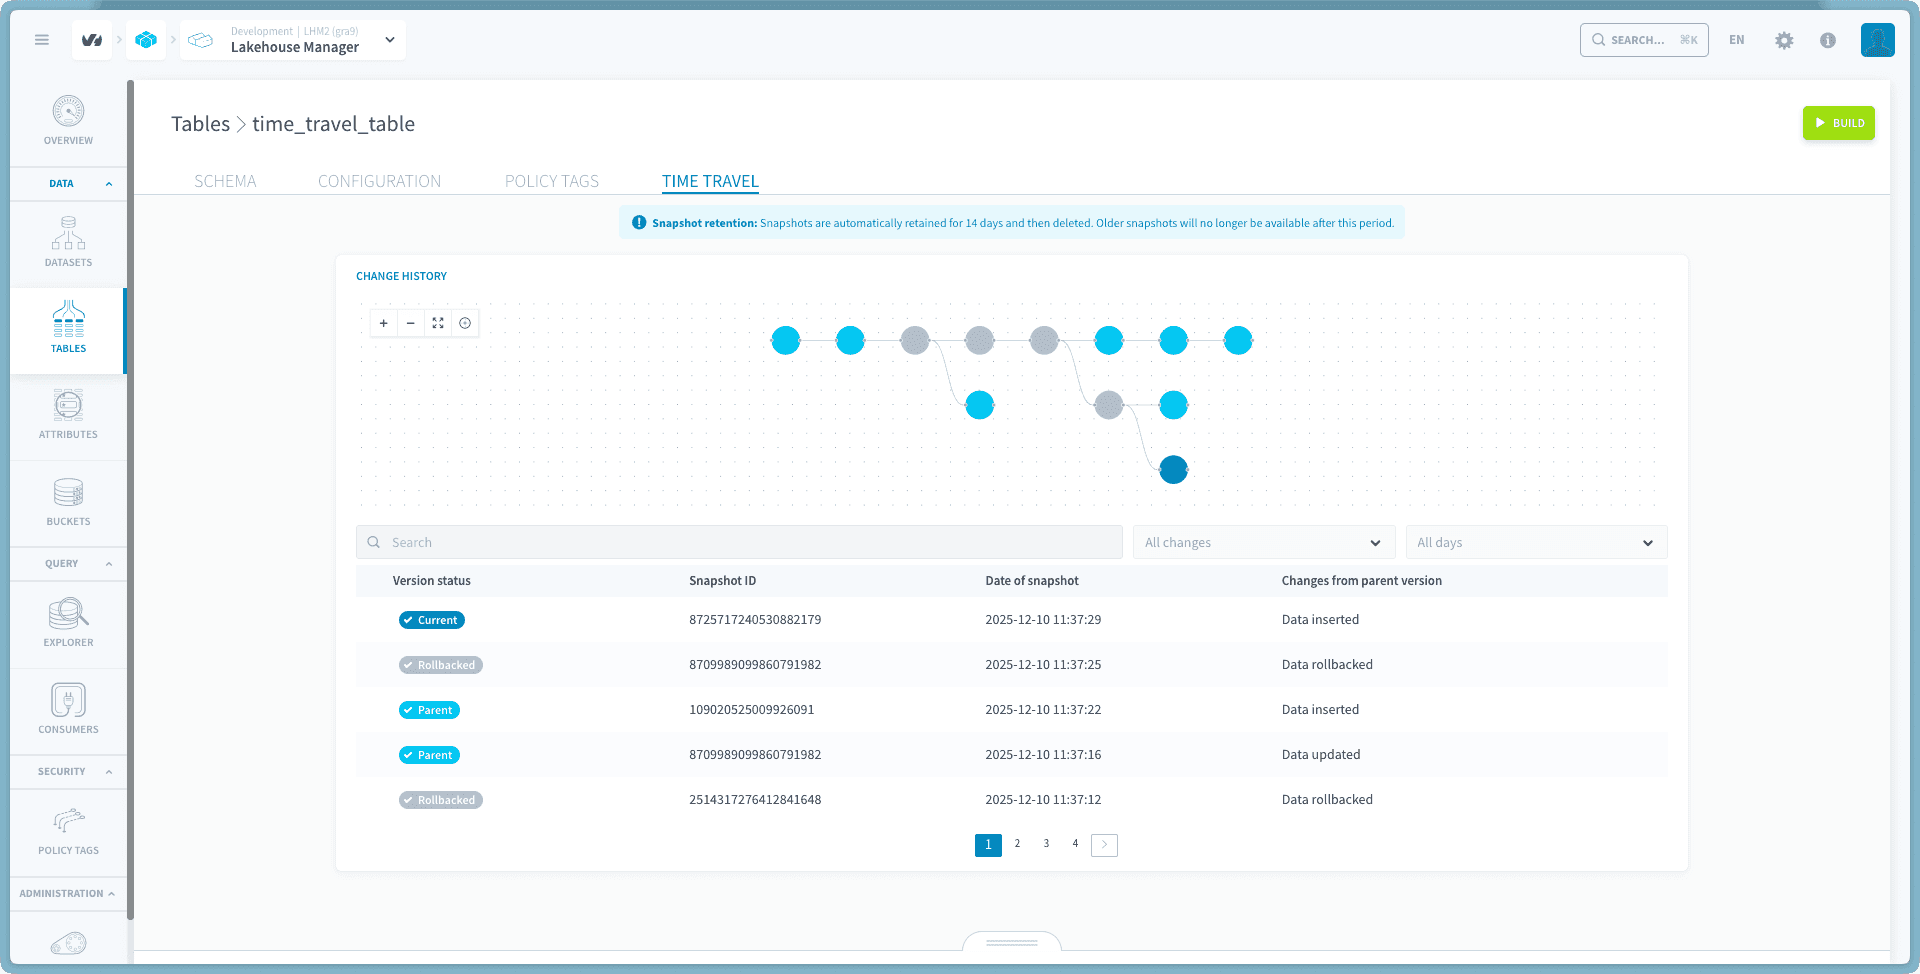
With Time Travel, every modification to a table such as data insertion, deletion, or other changes are automatically captured as a snapshot. These snapshots form a comprehensive version history that you can navigate, inspect, and use to revert your table to any previous point in time. This functionality is essential for data governance, debugging, and recovery from accidental changes.
Time Travel operates automatically in the background. Every change to your table creates a new snapshot without requiring any manual intervention or configuration.
Understanding snapshots
What is a snapshot?
A snapshot is an immutable point-in-time representation of your table's state, capturing both the data and schema as they existed at a specific moment. Each snapshot is identified by a unique snapshot ID and includes metadata about when it was created, what changes were made, and its relationship to other snapshots in the version history.
Snapshot retention:
- Default retention: 14 days
- Configurable range: 7 to 28 days
- Can be set at dataset level or overridden per table
- After expiration, snapshots are automatically deleted
Pro tip: Choose your retention period based on your data change frequency and recovery requirements. Tables that undergo frequent changes or contain critical business data may benefit from longer retention periods.💡
How snapshots are created
Snapshots are created automatically whenever you modify your table through operations such as data insertions, updates, deletions, or schema modifications. The platform captures the table's state and creates a new snapshot representing the post-change state.
Each snapshot maintains a parent-child relationship with its predecessor, creating a linked history that shows how the table evolved over time. Snapshots are lightweight and efficient, the storage system stores only the differences (deltas) between versions rather than complete copies.
Snapshot statuses
Snapshots can have the following statuses:
- Current: The most recent version of the table representing its current state (displayed in ● blue)
- Parent: The immediate predecessor of the current version (displayed in ● light blue)
- Rollbacked: A snapshot that was previously current but has been reverted from (displayed in ● gray)
Accessing the Time Travel interface
To access Time Travel for a specific table:
- Navigate to Lakehouse Manager from the main navigation menu
- Select Tables from the left sidebar
- Click on the table you want to view
- Click on the Time Travel tab
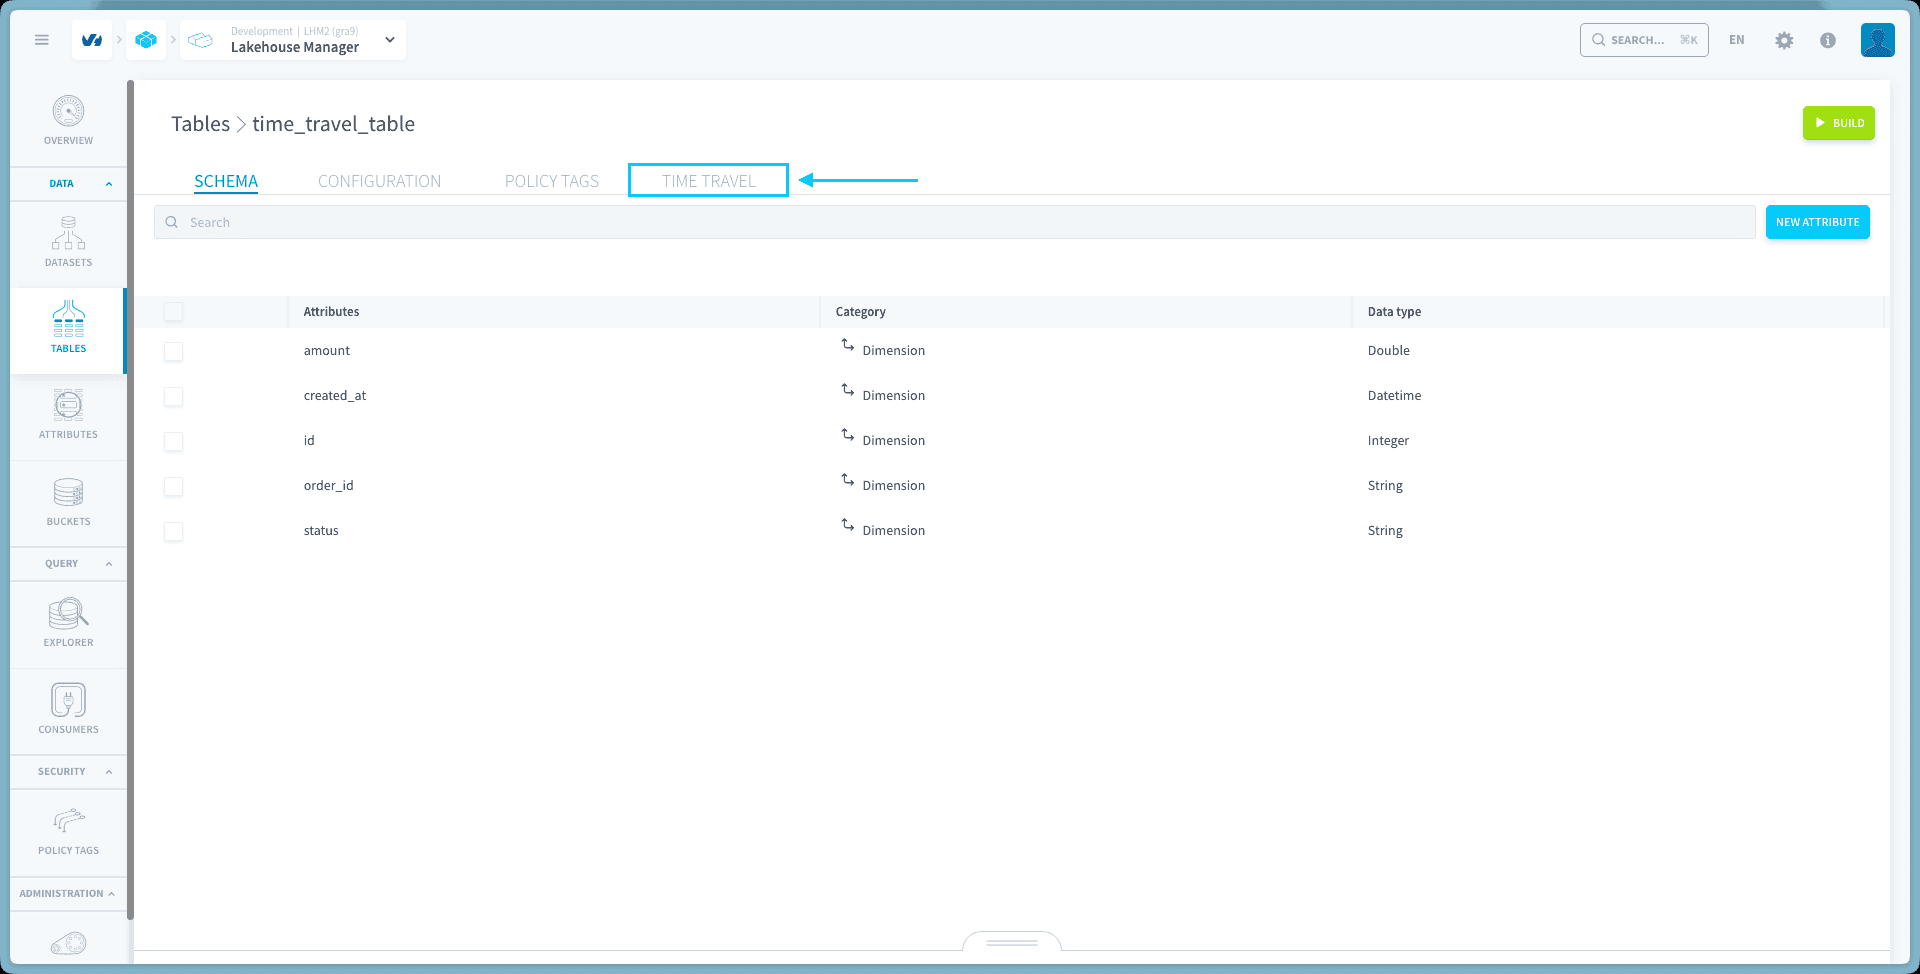
The Time Travel interface
The Time Travel interface is designed to provide both a high-level overview and detailed information about your table's version history. The interface is divided into two complementary sections that work together to help you understand and manage snapshots effectively.
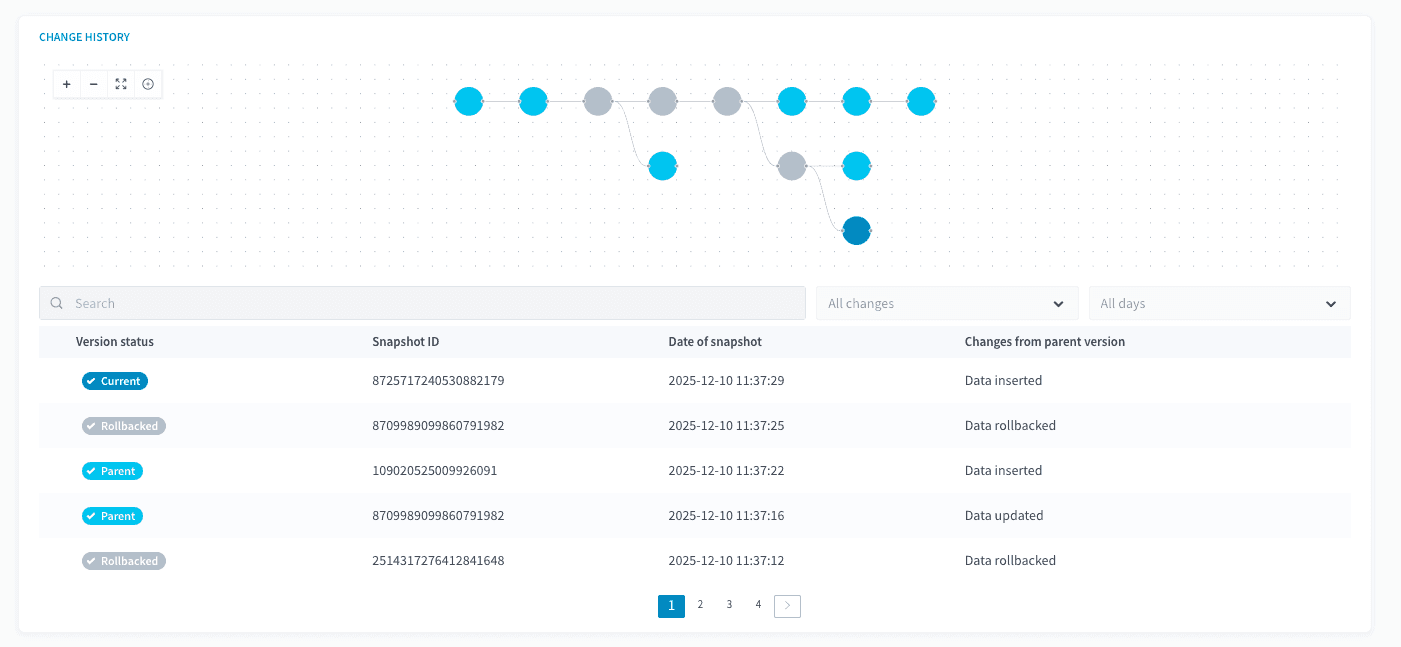
Changes history visualizer
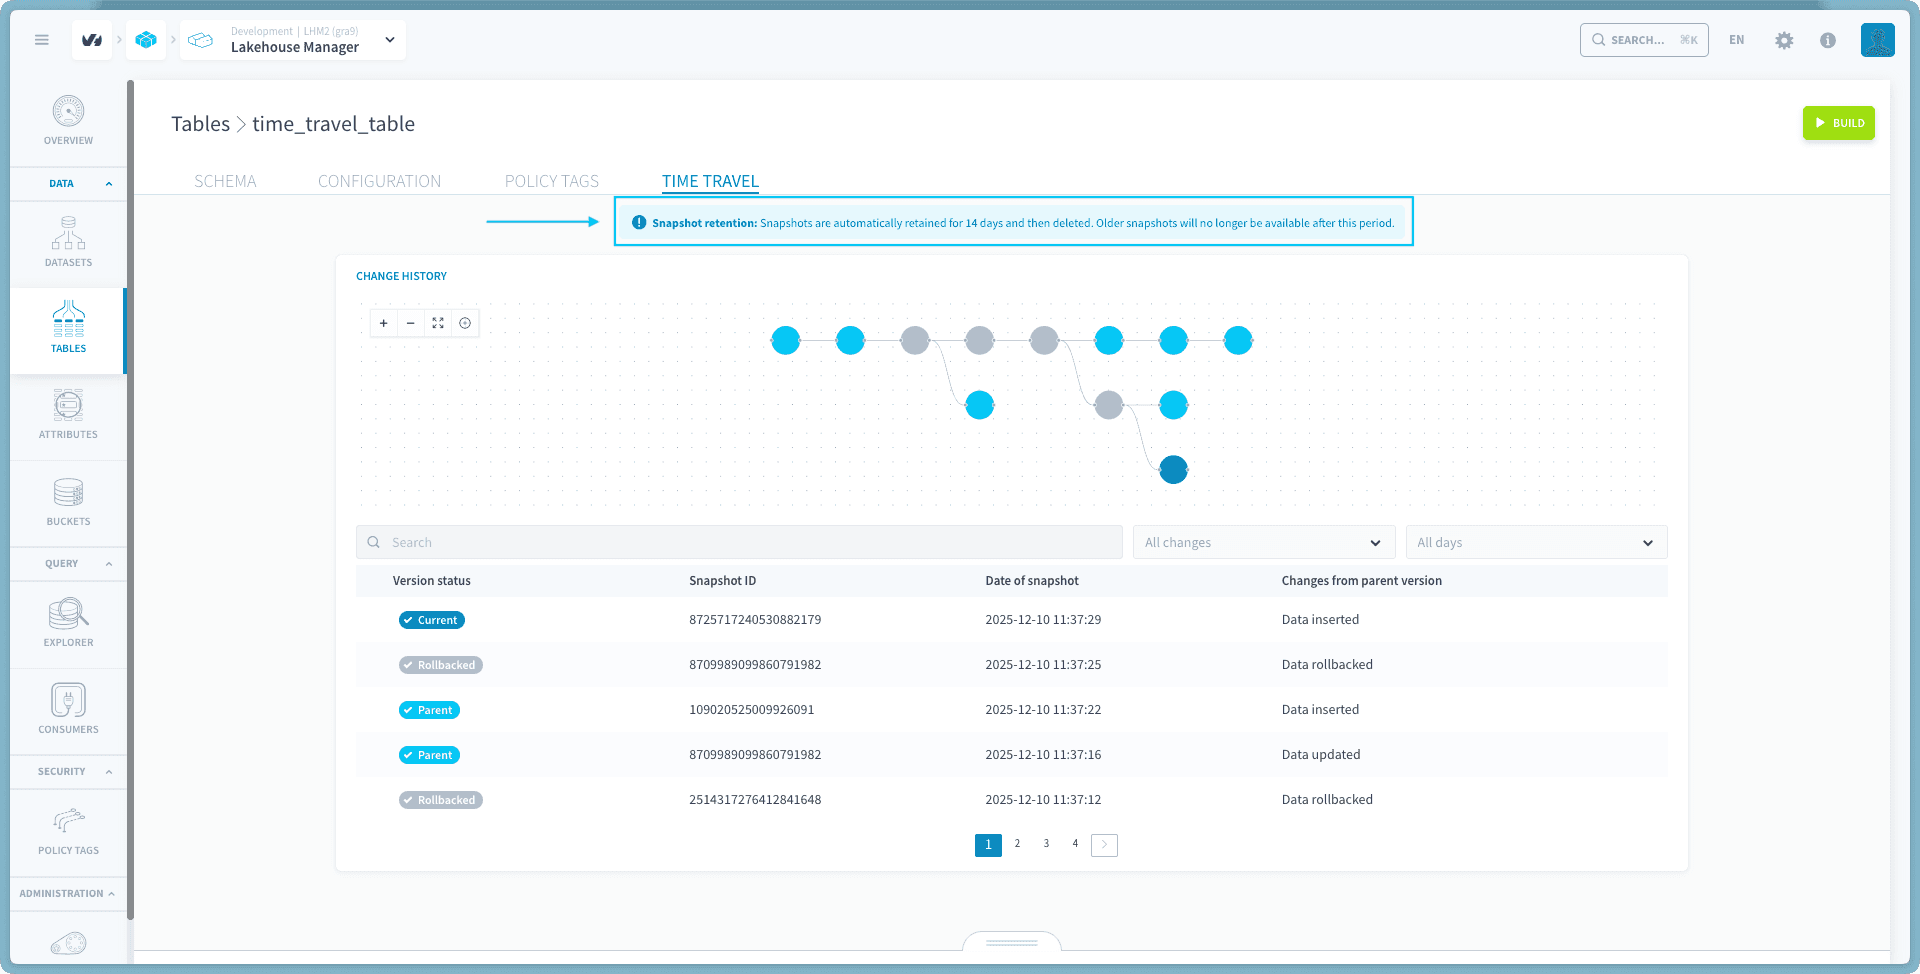
The Changes History Visualizer is a graphical timeline that provides an at-a-glance view of your table's evolution over time. This visual representation helps you quickly understand the pattern of changes, identify important versions, and see the relationships between different snapshots.

The visualizer displays snapshots as nodes on a timeline, with each node representing a specific version of your table. The nodes are connected by lines that show the parent-child relationships between snapshots, illustrating how changes flow from one version to the next. This linear representation makes it easy to trace the history of your table chronologically.
When operations such as reverts occur, the visualizer shows branching in the timeline. A revert creates a new current version that branches from an older snapshot, while the intermediate versions remain in the history. This branching visualization helps you understand the non-linear aspects of your version history and see how reverts affect the overall structure.
Graph controls
The visualizer provides several control buttons to help you navigate and view your version history:
- Zoom in: Enlarge the graph to see more detail
- Zoom out: Reduce the graph size to see more snapshots at once
- Fit view: Automatically adjusts the zoom level to fit the entire graph in the viewport, providing a complete overview of your version history
- Center on current node: Instantly jumps to and centers the view on the current (most recent) snapshot
These controls are especially useful when working with tables that have extensive version histories spanning many snapshots.
Interactive tooltips
The visualizer is fully interactive. Hovering over any node displays a tooltip with:

- Version status: Current, Parent, or Rollbacked (see Snapshot statuses)
- Snapshot ID: The unique identifier for this version
- Snapshot timestamp: When this snapshot was created
- Nature of change: Description of what changed (e.g., "Data inserted", "Data deleted", "Data updated")
Click on any node to copy its snapshot ID to your clipboard.
Snapshots list
The Snapshots List provides a detailed, tabular view of all snapshots for the table, ordered from newest to oldest. This list complements the visual timeline by offering comprehensive information and direct access to actions for each snapshot.
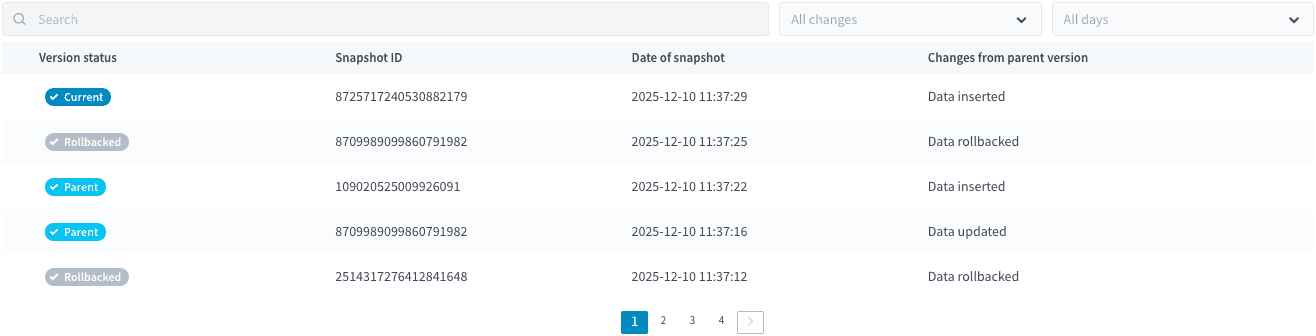
The list is paginated to handle tables with extensive version histories, ensuring the interface remains responsive even when dealing with hundreds of snapshots. You can navigate through pages to explore the complete history of your table.
Each row in the list represents a single snapshot and contains the following information:
-
Version Status: Indicates the snapshot's current state (see Snapshot statuses)
-
Snapshot ID: The unique identifier for this snapshot, used in queries, API calls, or support communications
-
Date of Snapshot: When this snapshot was created, displayed in your local timezone
-
Changes from Parent Version: Description of what changed in this snapshot. Common change types include:
- Data inserted: New rows were added to the table
- Data deleted: Existing rows were removed from the table
- Data updated: Existing rows were modified
- Data replaced: Existing data was replaced
- Data rollbacked: Rollback operation was performed
-
Actions:
- 🔍 Explore: Opens the snapshot in the Explorer to view its data
- ↻ Rollback: Restores the table to this snapshot's state
These actions are described in detail in the Working with snapshots section.
Working with snapshots
Filtering and searching snapshots
When working with tables that have extensive version histories, the Time Travel interface provides several tools to help you locate specific versions.

Search by Snapshot ID
The search bar allows you to find a specific snapshot by entering its ID. The list automatically filters as you type.
Filter by Change Type
View only snapshots that correspond to specific modifications:
- Data inserted: Show only snapshots where data was added
- Data deleted: Show only snapshots where data was removed
- Data updated: Show only snapshots where existing data was modified
- Data replaced: Show only snapshots where existing data was replaced
- Data rollbacked: Show only snapshots where rollback operation was performed
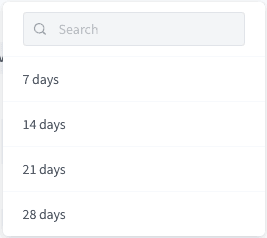
Filter by Time Range
Focus on snapshots created within a specific period:
- Last 7 days: Shows snapshots from the past week
- Last 14 days: Shows snapshots from the past two weeks
- Last 21 days: Shows snapshots from the past three weeks
- Last 28 days: Shows all available snapshots (within maximum retention)
You can combine multiple filters to narrow your search further.
Exploring a snapshot
The explore functionality allows you to inspect the data contained in a specific snapshot without affecting your current table. This is a read-only operation that provides visibility into historical states of your data.
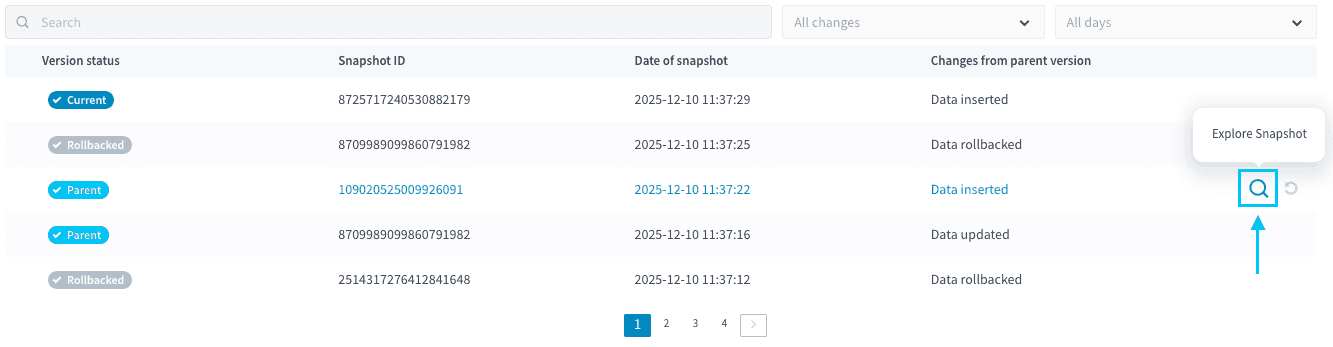
To explore a snapshot:
- Click the magnifying glass icon (🔍) next to the snapshot you want to inspect
- The Lakehouse Manager Explorer opens in a new tab with a pre-configured SQL query
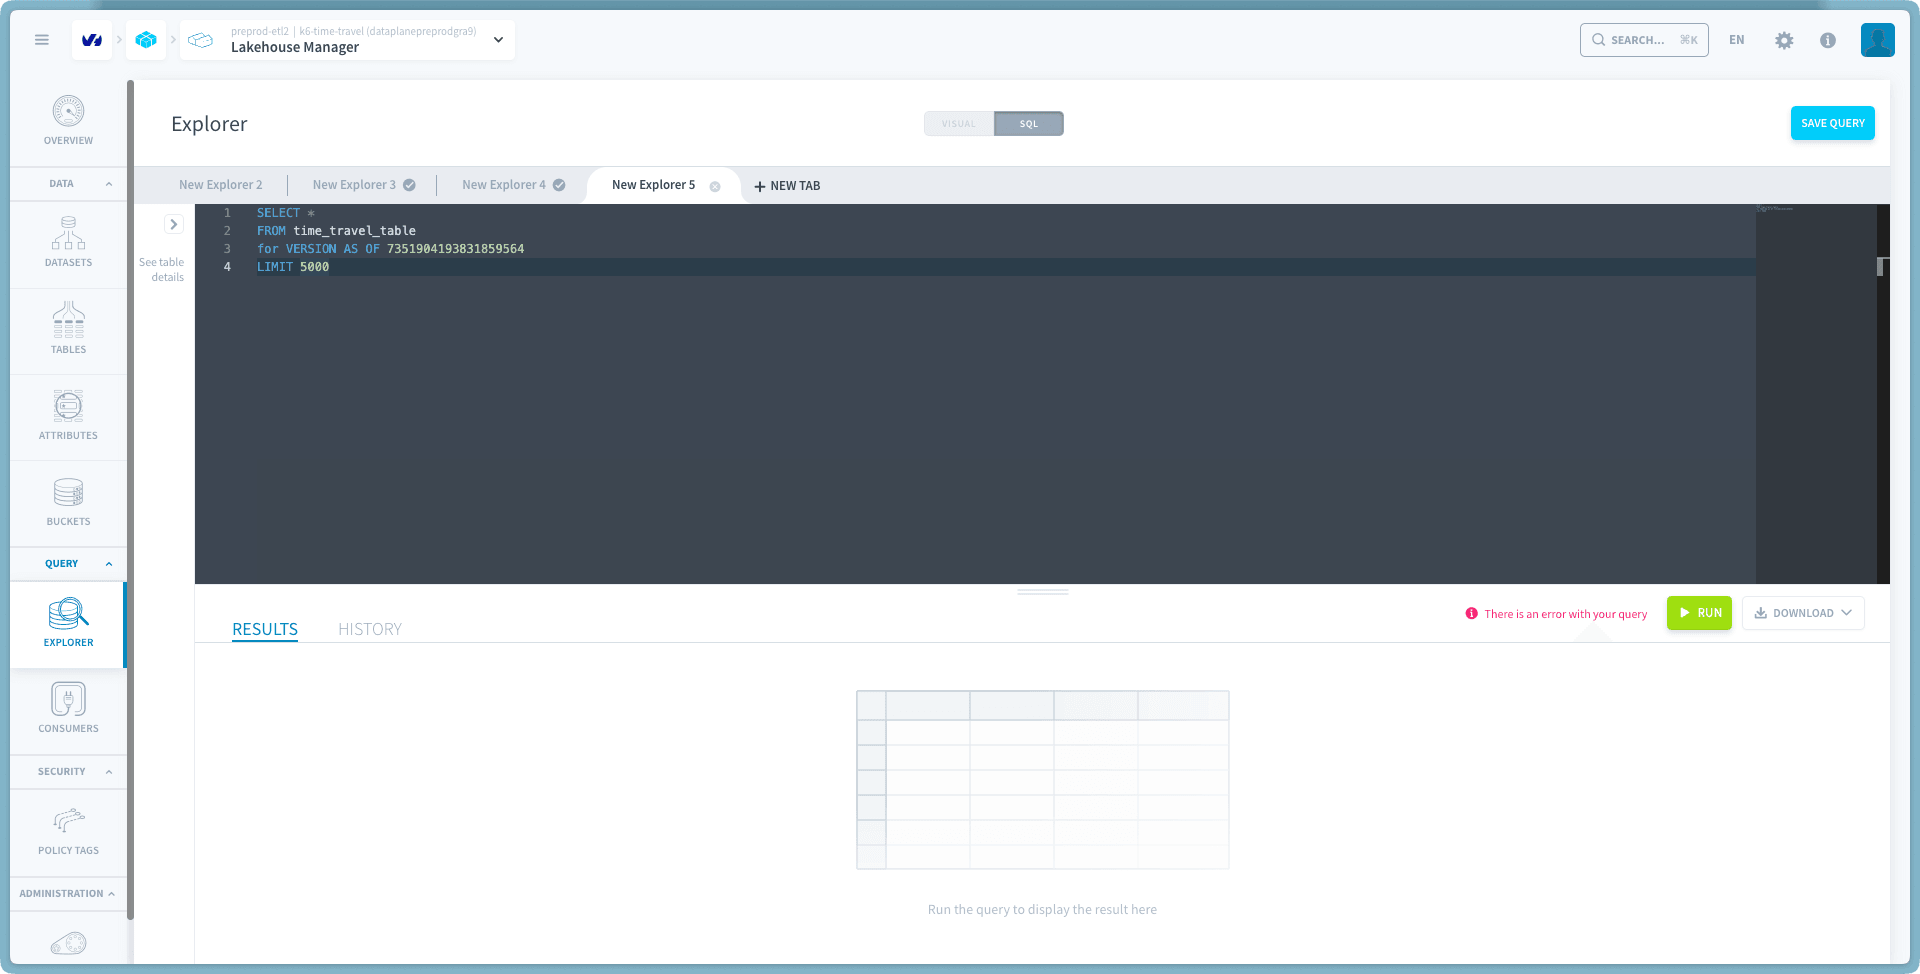
- Click "Run" to execute the query and view the snapshot data
- Interact with the data as needed: scroll, sort, filter, or export results
This exploration capability is particularly valuable for:
- Investigating when specific data values changed
- Verifying the state of data at a particular point in time
- Understanding the impact of past changes
- Retrieving data that was accidentally deleted or modified
Pro tip: Use the explore feature before performing a revert to verify that a snapshot contains the data you expect. This can prevent unnecessary revert operations.💡
Reverting to a previous snapshot
Reverting to a previous snapshot is a powerful capability that allows you to restore your table to a prior state. This operation creates a new snapshot that is identical to the snapshot you're reverting to, making it the new current version of your table.
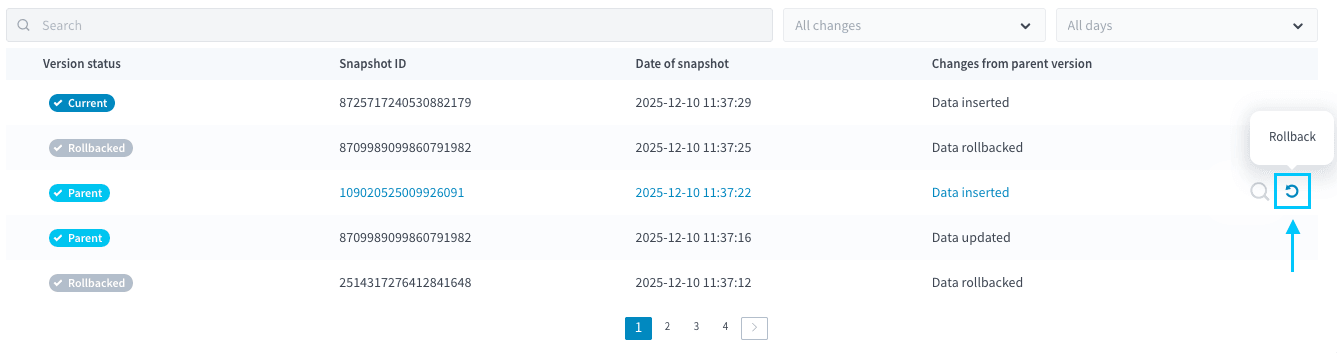
Reverting is a significant operation that affects your table's current data and schema. Because of its impact, the revert process includes mandatory confirmation steps to prevent accidental changes.
Step 1: Initiate the revert
Click the circular arrow icon (↻) next to the snapshot you wish to restore. This opens the revert confirmation dialog.
Step 2: Review the confirmation dialog
A modal dialog appears with important information about the revert operation:
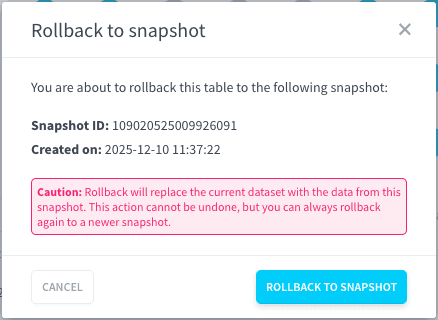
Step 3: Confirm or cancel
If you confirm, the system:
- Reverts your table to the selected snapshot, making it the current version
- Updates the Changes History Visualizer to show the branching that occurred
- Displays a success message
Understanding the result
After a successful revert:
- Your table now contains the exact data and schema from the snapshot you reverted to
- A new snapshot has been created at the current time, preserving this state
- All previous snapshots remain available in the history
- You can revert to a different snapshot later if needed, including reverting forward to a more recent state
Managing snapshot retention
Snapshot retention controls how long historical versions of your table remain available in the system. Proper retention management helps balance the need for historical data access with storage efficiency and cost considerations.
The current snapshot retention period for your table is always displayed in the Time Travel interface, ensuring you're aware of how long historical snapshots will remain available.
Configuring retention periods
Retention can be configured at two levels:
Dataset-level retention (default)
All tables within a dataset inherit the dataset's retention period, set to 14 days by default. You can modify this for an entire dataset to apply to all tables that haven't been individually configured with an override.
To configure dataset-level retention:
- Navigate to the Datasets section in Lakehouse Manager
- Click on the dataset to open its details page
- Access the configuration or settings panel
- Select your desired retention duration:
- 7 days (minimum)
- 14 days (default)
- 21 days
- 28 days (maximum)
- The changes are automatically saved
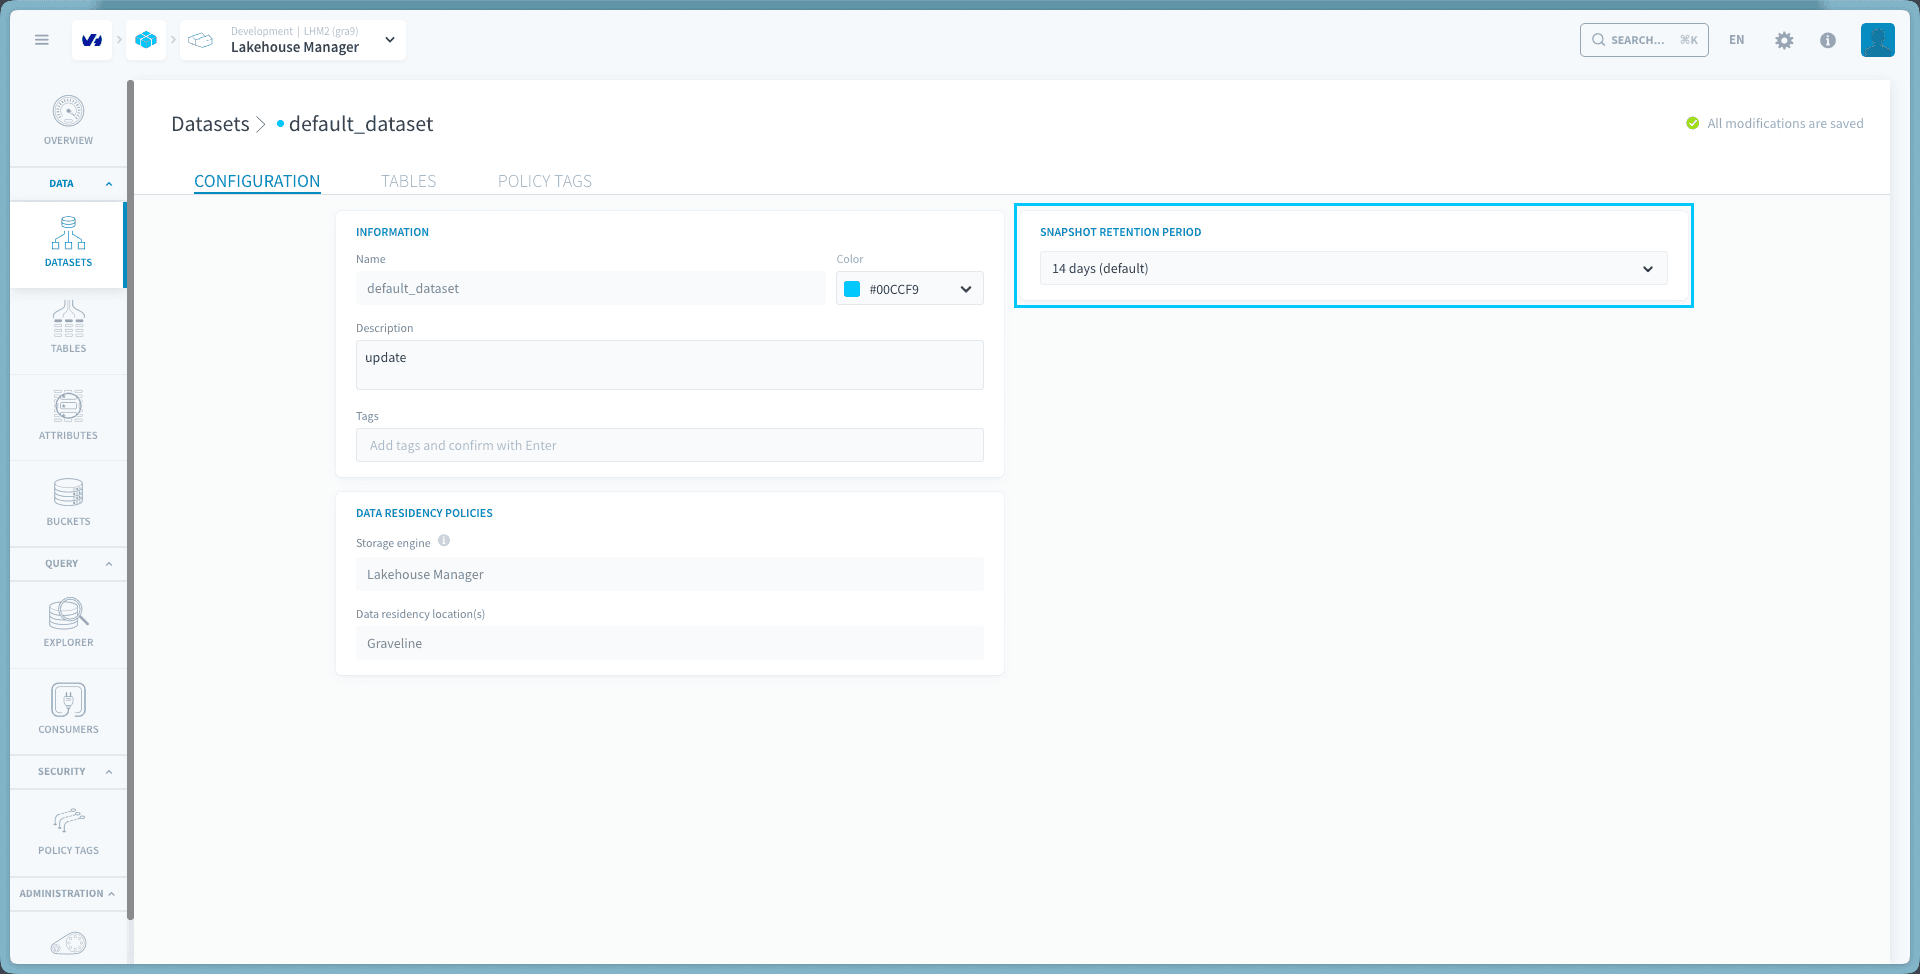
This change applies immediately to all tables within the dataset that don't have a table-level override configured.
Table-level retention override
For tables that require different retention periods than their parent dataset, you can configure a table-specific override. This override takes precedence over the dataset-level setting.
To configure table-level retention:
- Navigate to the specific table and open its details page
- Access the configuration or settings panel
- Enable "Override dataset retention"
- Select the retention period (7, 14, 21, or 28 days)
- The changes are automatically saved
- Verify in the Time Travel tab that the override is active
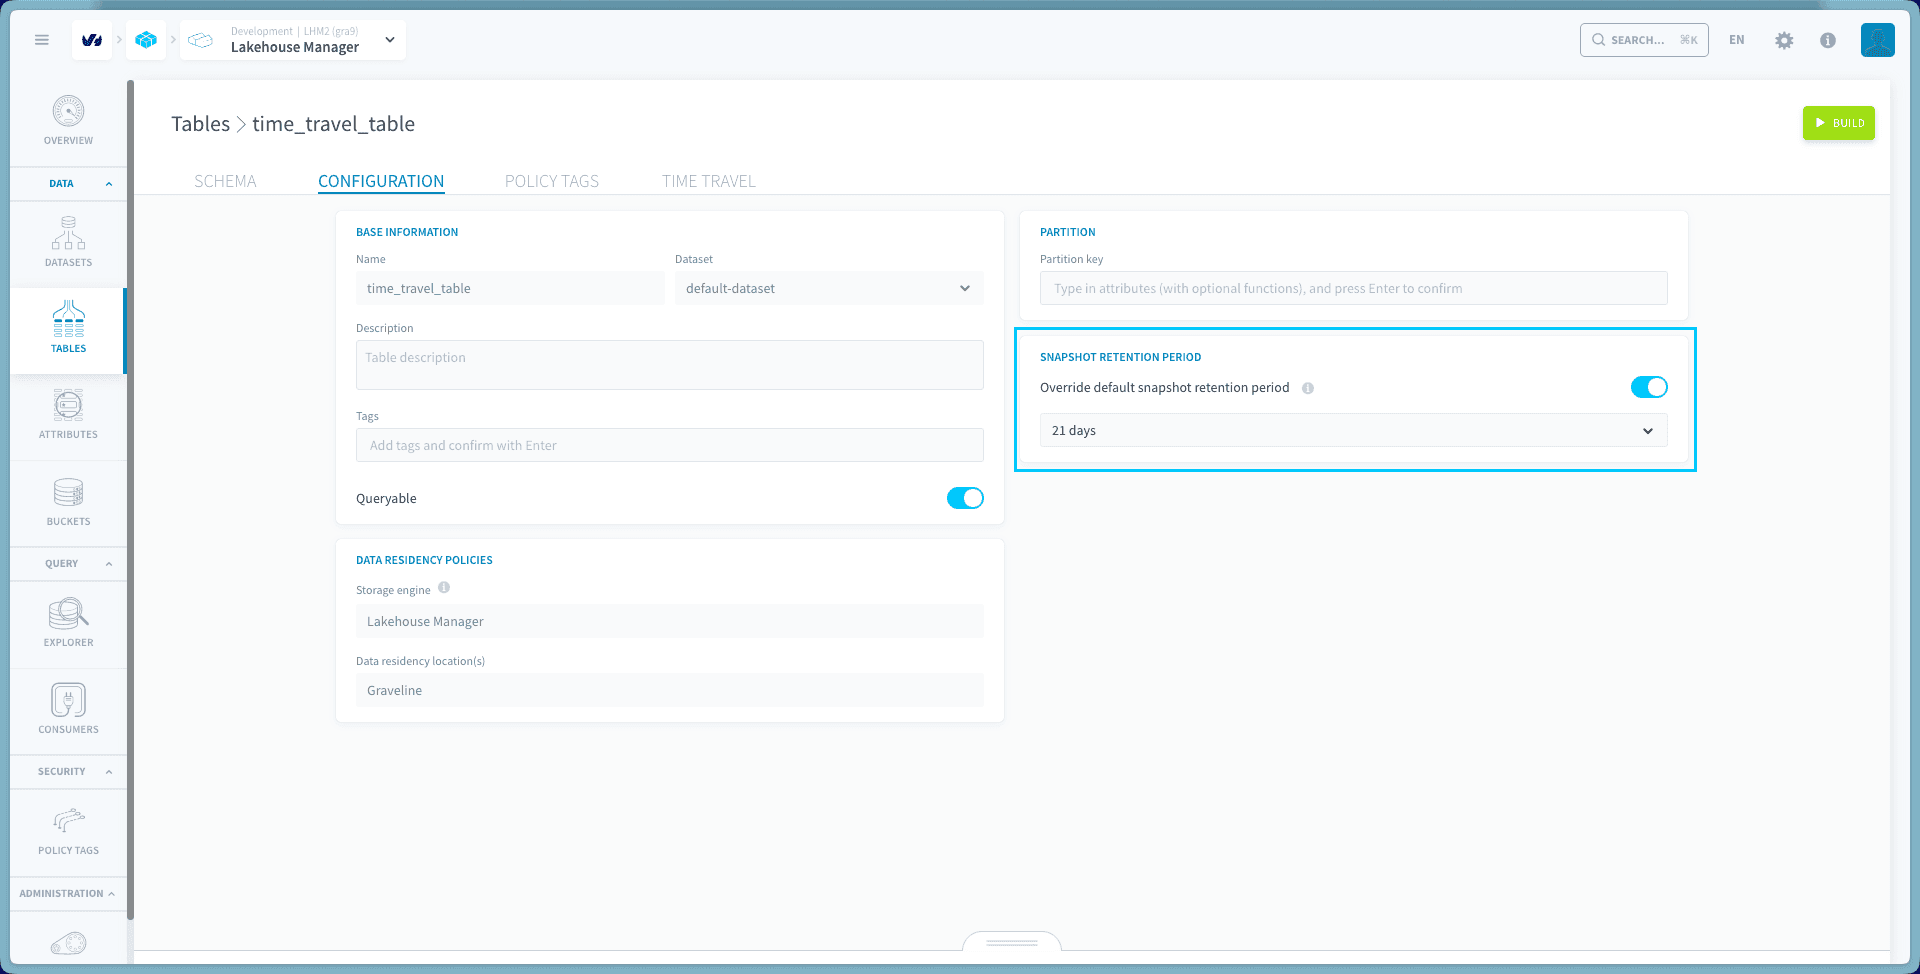
To remove a table-level override, simply disable the override setting in the table configuration.
Go further
If you need training or technical assistance to implement our solutions, contact your sales representative or click on this link to get a quote and ask our Professional Services experts for a custom analysis of your project.
Ask questions, give your feedback and interact directly with the team building the Data Platform on the dedicated Discord channel.
If you need support with your OVHcloud services, create a request in our Help Centre.
Join our community of users.